How to Point Godaddy Domain Name Servers to Hostgator
Estimated reading time: 2 minutes, 44 seconds
So, you have bought your domain from Godaddy as it is one of the best in this business and want to host it on Hostgator, one of the best Hosting solutions for all kinds of Webmasters and Bloggers. To do that, you need to Point Godaddy Domain Name to Hostgator and then install WordPress or any other CMS.
Also Read:- HostGator Review: Why to Choose HostGator Hosting ( Trusted Facts )
Now, A common question which you will always come across while doing this process, “How to Connect Godaddy Domain to Hostgator Hosting?” or “How to Point Godaddy Domain Name servers to Hostgator?“.
Do the same question coming to your mind, especially if you are a newbie, then you will surely need a guide to perform this action. And if you are looking for a guide, then you are at the right place, because below is the step by step guide which will help you Host Godaddy Domain on Hostgator. So, here we go without wasting too much time.
The procedure of Pointing Godaddy Domain Name servers to Hostgator
1. Sign Up for Hostgator
If you already bought a hosting plan from Hostgator, then you can skip this first step, but if you still looking to Buy, then go through this paragraph.
If you are confused between the hosting packages provided by this amazing hosting company, then below are some review which will help you choose the best one for you.
- How to Choose the best plan for your sites with Hostgator
- HostGator Review: Why to Choose HostGator Hosting ( Trusted Facts )
- About HostGator Business Plan
- About HostGator Baby Plan
- About HostGator Hatchling Plan
Now, after reading these posts, I suppose, you finalized the plan you want. Now, use these Hostgator Coupons, “LD9OFF” or “LD25OFF” to avail 25% Discount and get started or you can search on Google typing “Hostgator Black Friday” as it will help you get a discount up to 80% or you can click here to avail the best Hostgator deals.
2. Get Name Severs of Hostgator
Once you have bought your package, you will get Name Servers of Hostgator, on the left side of your Control Panel. Hostgator will also mail you your Login Details, Cpanel Login URL, and your Name servers in the Email Address while buying a hosting package. Name servers will look like this, XXXXXX.hostgator.com.
Example:-
- ns4475.hostgator.com
- ns4476.hostgator.com
3. Login to Godaddy and Open Domain manager
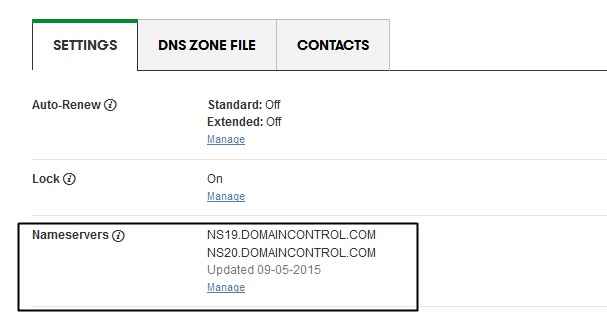
Now, it’s time to open your Godaddy Account and navigate through to the Domain manager to select your desired domain which you want to host on Hostgator. Just click on the domain, and you will see a screen like this.

4. Enter New Name Servers in Godaddy Domain Settings
In your next step, click on “manage” and add Custom Name Severs (which you got in your Mail after buying the hosting package) and then click Save.
After Saving your Domain is successfully pointed to Hostgator. Now, Just Add this domain as Addon Domain in your Hostgator Hosting Cpanel and Install WordPress. Once done, your Website is ready to rock the internet World.
Also Read:-
So, that’s it. If you any further questions regarding this, then feel free to ask via comments.
